


In this article, I am going to show you how to design and implement free PHP based course management system (CMS) on Microsoft Azure Ubuntu based virtual machines.
What is Moodle?
Moodle is a free PHP based course management system (CMS) designed to help educators create great courses for students. Many reputable universities and colleges are using it to run their courses online. Students will also find it easy to use and work on. Teachers and students can also use it to collaborate and build great teaching materials.
Moodle on Azure Architectural Diagram
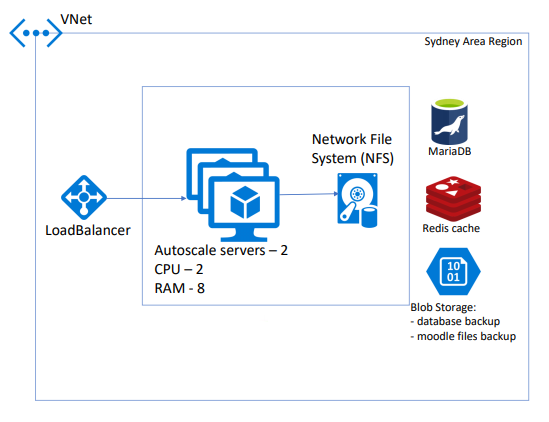
- Auto scale Azure VMs
- 2 Ubuntu server holding nginx
- Moodle
- NFS Server/Storage with HA
- Azure MariaDB
- Azure blob Storage
- Moodle DB/Files Backup
- Cache Redis Cache with plugin installed in Moodle
- Load balancer
- Distribute traffic to auto-scale VMs
Setup and Configure Azure Infrastructure for Moodle deployment
I am not going to show you each and every single steps to setting up Azure infrastructure. However, you can follow my architecture diagram if you want to create same environment. Below are the high-level steps only:
I have Created an Azure Resource Group in “Australia East” location:

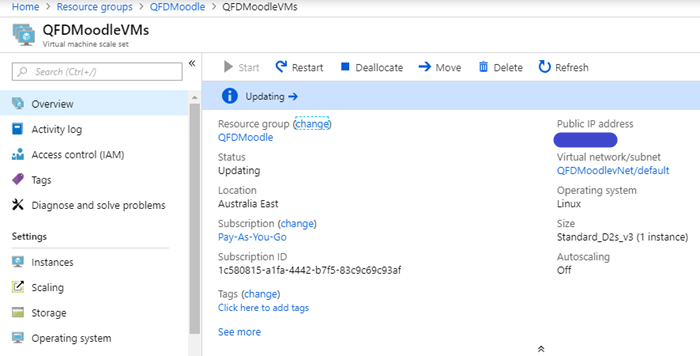
Provisioned Ubuntu 16.04 LTS Virtual machines in Auto-Scale set (Max 2). That can easily handle 100 concurrent sessions:
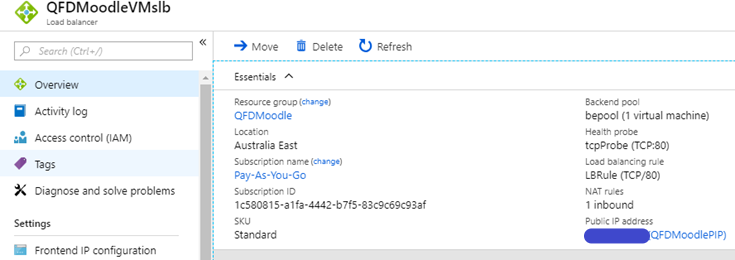
Azure Load balancer to distribute traffic between VMs and configured NAT rules to securely SSH into the VMs:
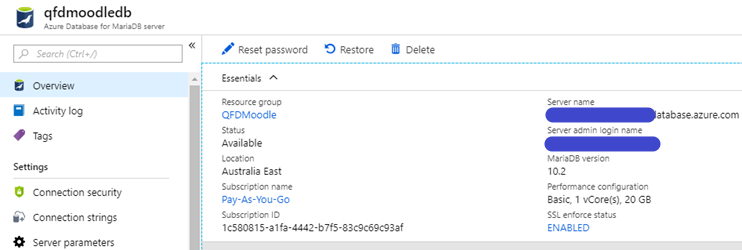
Azure Maria Database (DaaS) for storing moodle data:
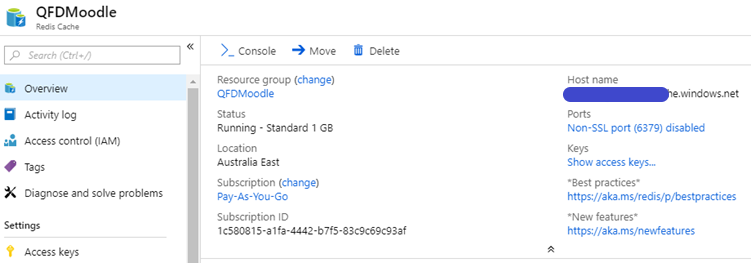
Microsoft Azure Redis Cache:
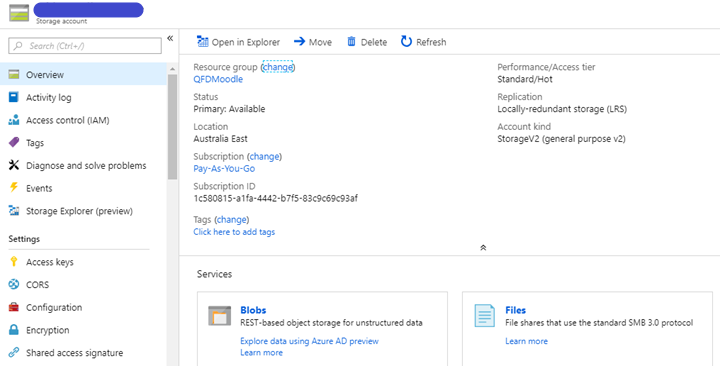
Azure storage account to storing moodle db backup:
Step-by-Step Installation and configuration of Moodle on Ubuntu Server
Moodle requires a webserver. We can use Apache or Nginx and I will prefer Nginx as it is most popular and more powerful webserver.
Step No. 1: Install Nginx
So, let’s install Nginx on Ubuntu with below command:
sudo apt-get install nginx
After installing nginx, run below commands to start and enable nginx service to always start up with the server boots.
sudo systemctl start nginx.service
sudo systemctl enable nginx.service
Step No. 2: Install MariaDB
In order to store data we need a Database server, so we use here MariaDB. To install MariaDB, run below commands:
sudo apt-get install mariadb-server mariadb-client
After installing mariadb, run below commands to start and enable mariadb service to always start up with the server boots.
sudo systemctl start mysql.service
sudo systemctl enable mysql.service
Then run below command to secure Mariadb installation:
sudo mysql_secure_installation
When prompted, answer the questions as given in below details:
- Enter current password for root (enter for none): Just press the Enter
- Set root password? [Y/n]: Y
- New password: Enter password
- Re-enter new password: Repeat password
- Remove anonymous users? [Y/n]: Y
- Disallow root login remotely? [Y/n]: Y
- Remove test database and access to it? [Y/n]: Y
- Reload privilege tables now? [Y/n]: Y
After that, open MariaDB default configuration file with below command:
sudo nano /etc/mysql/mariadb.conf.d/50-server.cnf
Then add the below lines just below [mysqld] section.
default_storage_engine = innodb
 innodb_file_per_table = 1
 innodb_file_format = Barracuda
innodb_large_prefix = 1
Now save the file and exit. Restart Mariadb server by running below command:
sudo systemctl restart mysql.service
Step No. 3: Install PHP 7.1-FPM
By default, PHP 7.1-FPM is not available in Ubuntu default repositories. in order to install it, you will have to get it from third-party repositories.
Run the commands below to add the below third party repository to upgrade to PHP 7.1:
sudo apt-get install software-properties-common
sudo add-apt-repository ppa:ondrej/php
Then run update and upgrade to PHP 7.1
sudo apt update
Finally run the commands below to install PHP 7.1 and related modules:
sudo apt install php7.1-fpm php7.1-common php7.1-mbstring php7.1-xmlrpc php7.1-soap php7.1-gd php7.1-xml php7.1-intl php7.1-mysql php7.1-cli php7.1-mcrypt php7.1-ldap php7.1-zip php7.1-curl
After install PHP, run the commands below to open PHP-FPM default file:
sudo nano /etc/php/7.1/fpm/php.ini
Then change the following lines below in the file and save. You may increase the value as per your environment needs:
file_uploads = On
allow_url_fopen = On
memory_limit = 256M
upload_max_filesize = 64M
max_execution_time = 360
 cgi.fix_pathinfo = 0
date.timezone = Australia/Brisbane
Step No. 4: Create moodle database
Now that you’ve install all the packages that are required, continue below to start configuring the servers. First run the commands below to create moodle database.
Run the commands below to logon to the database server. When prompted for a password, type the root password you created above.
sudo mysql -u root -p
Then create a database called moodle
CREATE DATABASE moodle;Create a database user called moodleuser with new password
CREATE USER 'moodleuser'@'localhost' IDENTIFIED BY 'new_password_here';Then grant the user full access to the database.
GRANT ALL ON moodle.* TO 'moodleuser'@'localhost' IDENTIFIED BY 'user_password_here' WITH GRANT OPTION;
Lastly, save your changes and exit.
FLUSH PRIVILEGES;
EXIT;
Step 5: Download and Install Moodle
Execute below command to download Moodle latest release.
cd /tmp && wget https://download.moodle.org/download.php/direct/stable33/moodle-latest-33.tgz
Then run below command to extract the downloaded file to Nginx default root.
tar -zxvf moodle-latest-33.tgz
sudo mv moodle /var/www/html/moodle
Run below command to change and modify the directory permission.
sudo chown -R www-data:www-data /var/www/html/moodle/
 sudo chmod -R 755 /var/www/html/moodle/
Step 6: Configure Nginx
Finally, configure Apahce2 site configuration file for moodle. This file will control users access Moodle content. Run below command to create a new configuration file called moodle.
sudo nano /etc/nginx/sites-available/moodle.conf
Then copy and paste the content below into the file and save it. Replace domain name and directory root location with your details:
server { listen 80; listen [::]:80; root /var/www/html/moodle; index index.php index.html index.htm; server_name example.com www.example.com; location / { try_files $uri $uri/ =404; } location /dataroot/ { internal; alias /var/www/html/moodledata/ } location ~ [^/]\.php(/|$) { include snippets/fastcgi-php.conf; fastcgi_pass unix:/var/run/php/php7.1-fpm.sock; fastcgi_param SCRIPT_FILENAME $document_root$fastcgi_script_name; include fastcgi_params; } }
Save the file and exit.
Step 7: Enable Moodle Site
After configuring the VirtualHost above, enable it by running below command:
sudo ln -s /etc/nginx/sites-available/moodle /etc/nginx/sites-enabled/
Then restart Nginx services by running below command:
sudo systemctl restart nginx.service
STEP 8: OBTAIN AND CONFIGURE LET’S ENCRYPT SSL CERTIFICATES
To install and configure “Let’s Encrypt SSL Certificate” Please refer to my previous article:
Install and Configure Let’s Encrypt SSL Certficate
STEP 9: Finalization and Verification
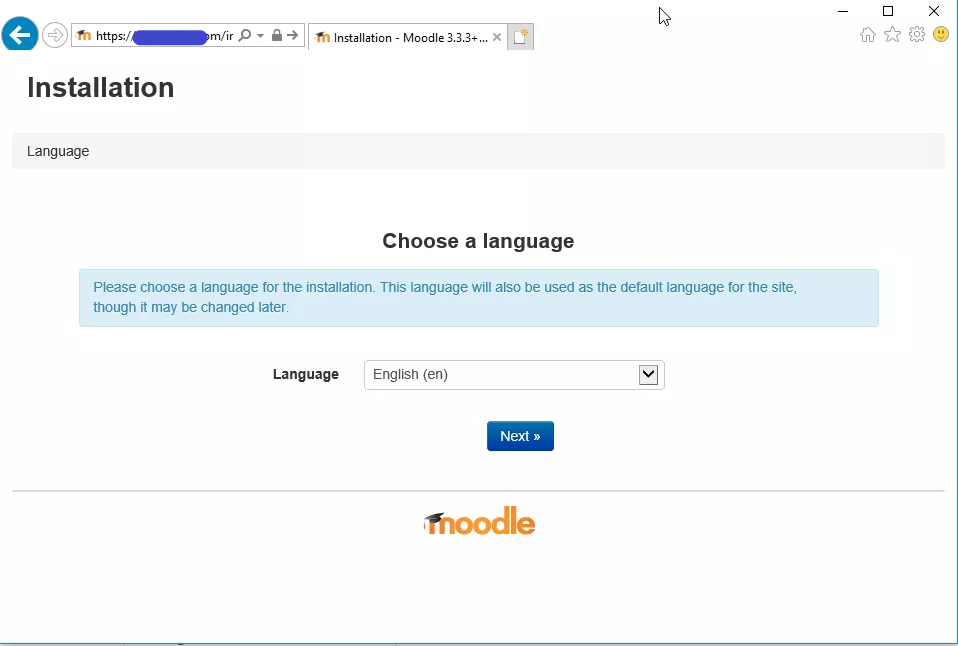
After that, open your browser and browse to your domain name to start Moodle configuration wizard. You should see Moodle setup wizard, Please follow the wizard and complete the tasks.
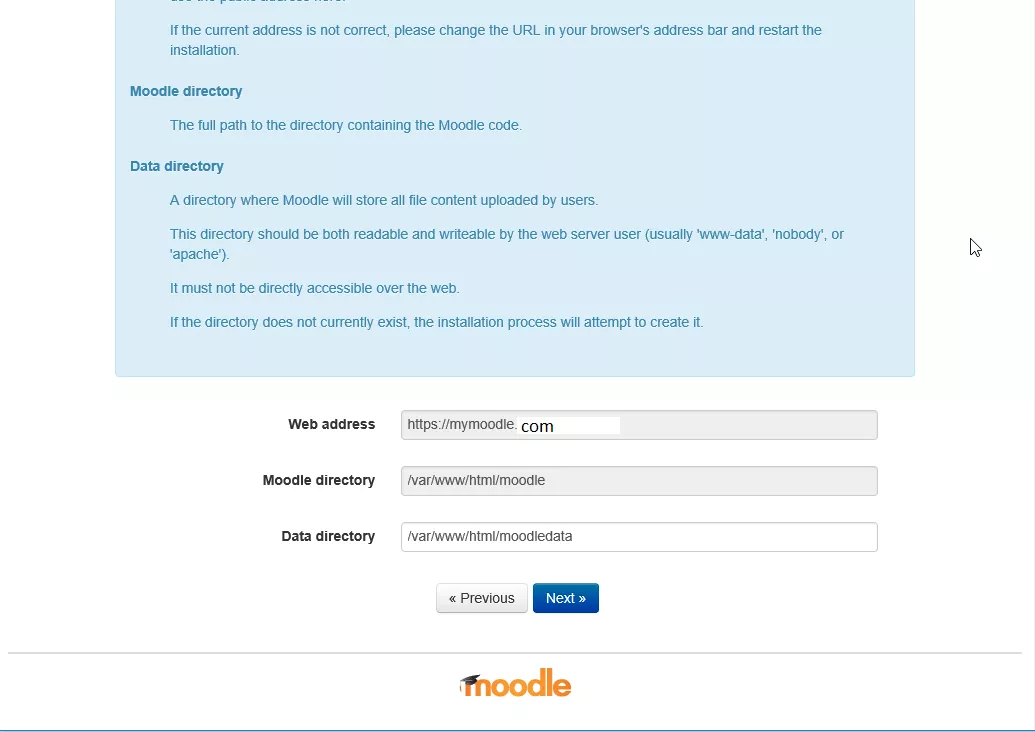
Select default file directory and click on Next button:
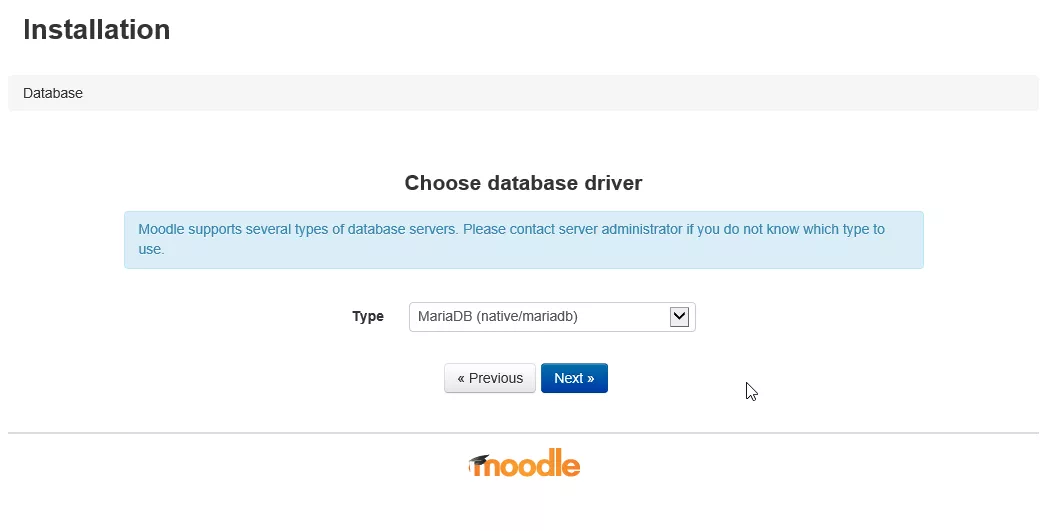
Make sure to select MariaDB database driver from below list:
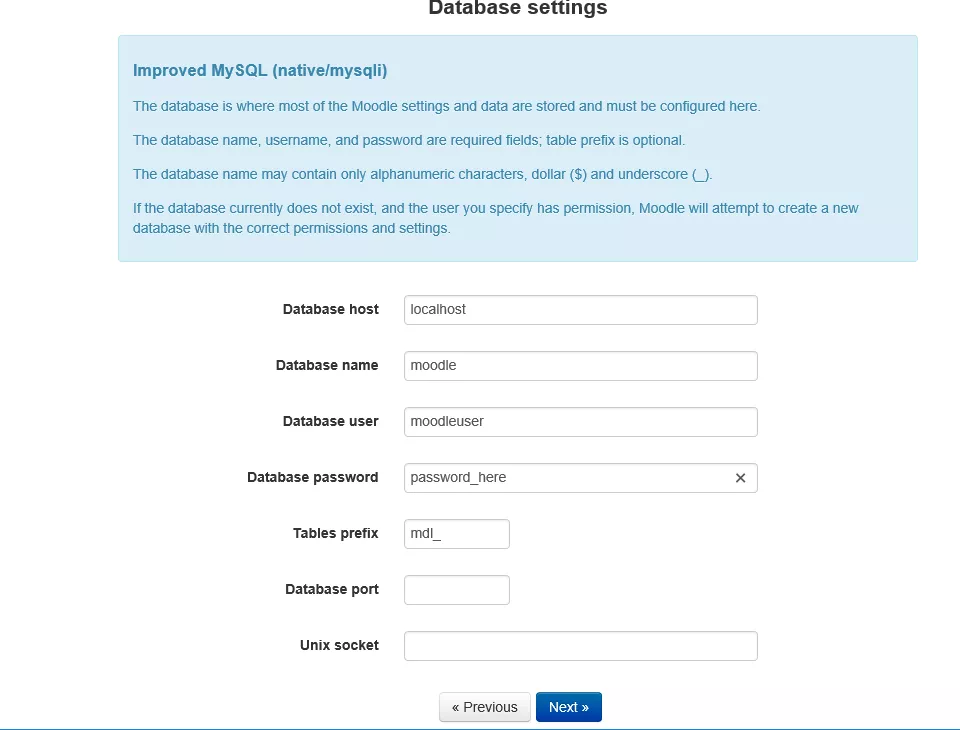
Enter the database connection information and click on Next button.
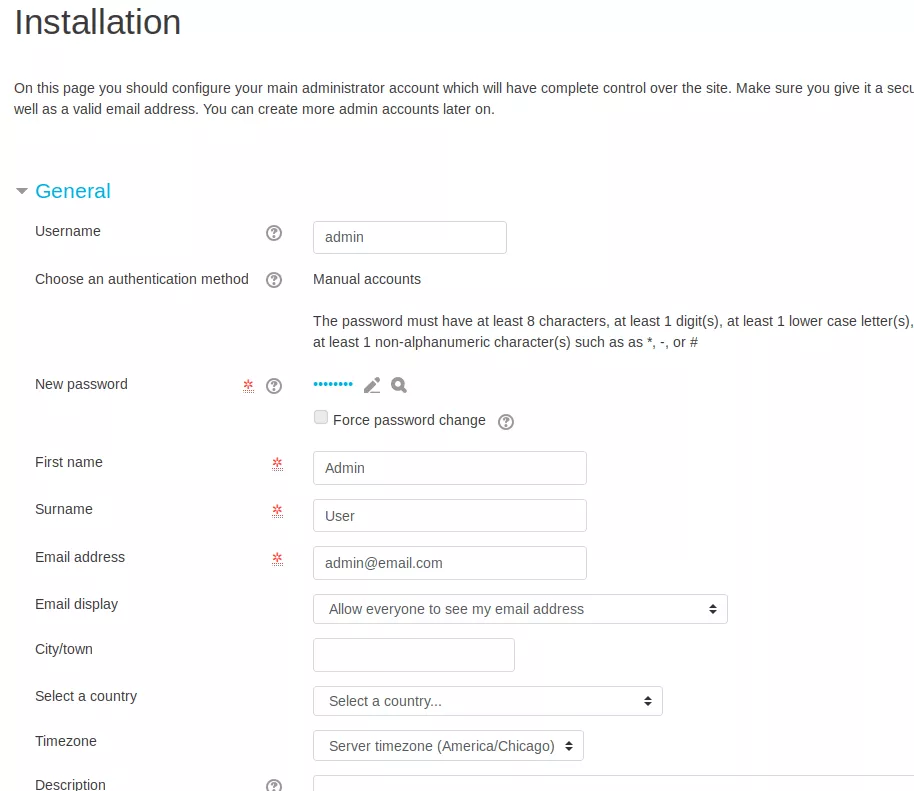
Now, type admin and password for the website and continue.
When you are done with configuration, Moodle should be installed and ready to use.

Congratulation we have successfully installed Moodle running on Microsoft Azure infrastructure virtual machines.